Selfie-mask: application help
First, take a selfie as close to your face as possible. If you wear glasses, make sure to remove them. Keep your head as straight and level as you can. Try not to tip the camera because you might end up with an enlarged or distorted nose. Then crop the image such that each cheek is near each edge, the bottom of the chin is near the bottom and the top edge includes the bridge of your nose.
You might have to do a little trial and error, but if you size the image so that it's between 3.8 and 4.2 inches from the bridge of your nose to the tip of your chin you should be in the ballpark.
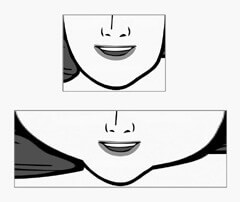
The Selfie-mask image generator app creates the illusion of the curvature of your face from the flat image you started with by wrapping around your cheeks, towards your ears.
Please Note: If you don't want to pre-crop your selfie image, no worries, the Selfie-mask image stretcher app includes a cropping tool that you can use after you've selected your selfie file(s). More information on the bulit-in cropping tool is available at the end of this document.
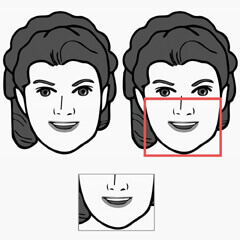
 Ideal crop for a selfie-mask
Selfie-mask image stretching
Start-out by selecting the selfies that you want to stretch.

With your selfie(s) selected, click the "Generate" button to stretch the image. Once your image is stretched, simply press or or right-click to save the image to your device or pc.


Image stretching options/filters
The Selfie-mask app includes a couple of options for image manipulation. There are two range-controls that allow you to manage the amount of stretching, and anothe control that allows you to remove some of the color vibrancy, for a more realistic end-result after printing.
Stretch amount
Most cropped selfies will be square, so leave the stretch range in the middle. If your selfie image is vertically-oriented, move the range towards "+". If your image is a horizontal rectangle, move the range towards "-".


Saturation
Move the saturation range towards "+" if your image's color appears grayish and not very colorful. Move the range towards "-" to diminish the image's vibrancy. Changing this setting may help, depending on your printer. If printing via an inkjet printer, we recommend trying a lower (lesser) setting.


Again, you might have to do a little trial and error, as different printers can create varying results.
Cropping tool
If you don't want to pre-crop your selfie image that's fine, the Selfie-mask image stretcher app includes a cropping tool that you can use after you've selected your selfie file. Simply press (or click) on your preview image (before clicking Generate). A pop-up will appear, with a pre-selected blue box.


Hover over the edges and click (or press) on the blue lines to resize the box. you can click and hold to drag the box around, if you like. On mobile devices, this is accomplished by pressing and dragging to reposition.
When you're satisfied that the blue lines are properly aligned, press the "Crop" button. On mobile devices, you may need to scroll down to view the button.

After clicking the crop button, your original image will be replaced with the cropped image. You are now ready to click the "Generate" button and continue on, following the steps described above.
