Selfie-mask: bulk processing
Our Selfie-mask bulk image generator is a Windows PowerShell script that allows you to stretch cropped selfie-mask images from the comfort of your workplace—or living-room, for that matter.
Requirements
In order to use this script, you need to be running a Windows O/S with an active connection to the internet. The script supports the following image formats: bmp, gif, jpg (or jpeg) and png. Any files not using these file extensions (and image-files larger than 4MB) will automatically be refused. Preferred formats are png and jpg, as they are compressed (smaller files) while also providing quality image resolution.
Functionality
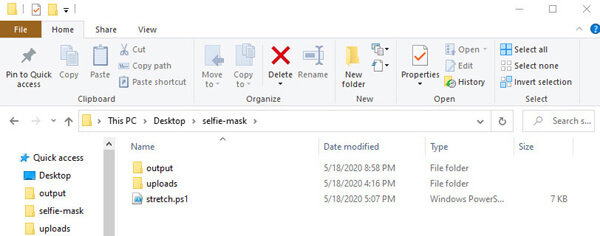
Our script looks for pre-cropped selfies stored in a special folder named 'uploads'
under a folder named 'selfie-mask', and it uploads those images to our web-service in
order to create stretched versions of the images. The stretched files are then
sent back to your PC and placed in another special folder named 'output'.
Download
Download a compressed (zip) folder of our script and its corresponding files here: selfie-mask.zip.
After downloading, extract the contents of the zipped folder to any location on your PC… even your Windows Desktop.
Set-up instructions
- On your Windows PC…
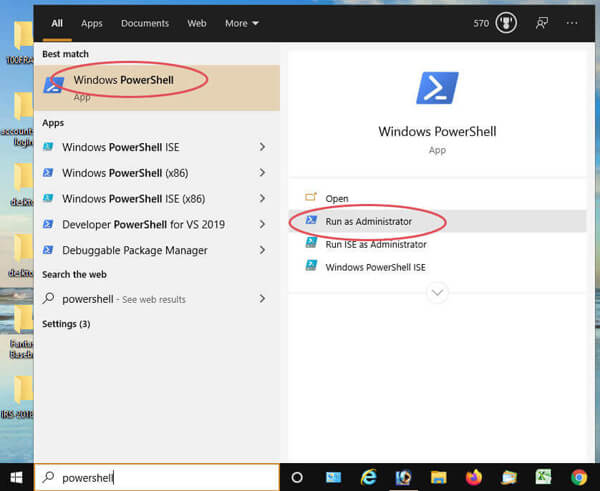
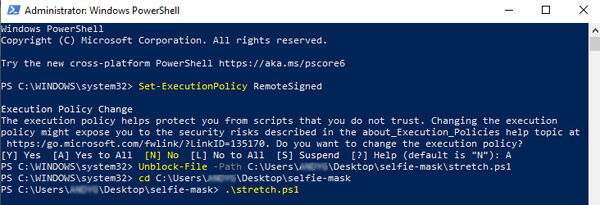
- Step 1: Search (or Start/Search) for PowerShell. Right-click or hover over the top-result and click the 'Run as Administrator' option to the right. A command-line window with a blue background will appear.

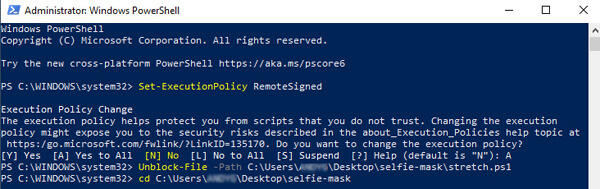
- Step 2: At the PowerShell command prompt, type the following command and press 'enter':
- Set-ExecutionPolicy RemoteSigned
- Step 3: Type A and press your 'enter' key to accept the policy change.
- Step 4: At the PowerShell prompt, run the Unblock-File command, specifying the exact location of your stretch.ps1 script. For example, if the selfie-mask folder is on your Windows Desktop, you'd type something similar to the following command:
- Unblock-File -Path C:\Users\[USERNAME]\Desktop\selfie-mask\stretch.ps1
- …and press 'enter'
- Note: Be sure to replace the above folder named '[USERNAME]' with the name of your own personal user-folder on your PC.
- Also: An alternative approach to running the Unblock-File command is to create your very-own script. You can do this by copying the contents of the 'stretch.ps1' file into a brand-new text file. Save that text file, and rename it, setting the file extension to 'ps1'. Scripts created by you on your own PC are unblocked, by default.
- At this point, you should be ready to run our PowerShell Selfie-Mask bulk-stretching script. If you've set things up correctly, your scripts will be able to run under via the PowerShell command line enviroment, and you won't have to repeat any of the above steps again.
- Remember, your PC must be connected to the internet for this script to sucessfully execute.


Running the script
- In order to run the script you'll need to use the PowerShell command-prompt to navigate to your selfie-mask folder. For example:
- cd C:\Users\[USERNAME]\Desktop\selfie-mask
-
- At this point, you can run the script by typing at the command-prompt:
- .\stretch.ps1
- New feature! You can now control the amount of stretching by adding a parameter. Enter any number between 30 and 70 to control the amount of stretching (loosely translates to 3x through 7x). The default value is 50. If you don't add a parameter, we'll stretch the cheeks at the value of 50 (about 5x).
- .\stretch.ps1 65
-
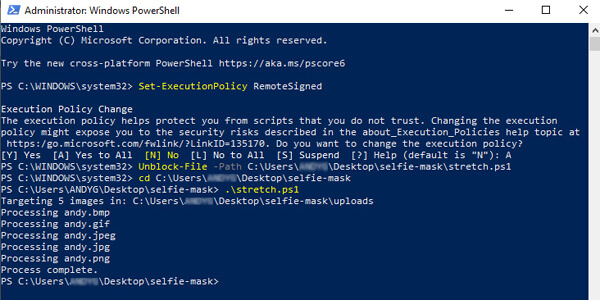
- Here's something similar to what you'll see after the script has successfully completed:
-
Additional details
- Leave the 'selfie-mask' folder intact… perhaps place it on your Windows Desktop. That said, it really doesn't matter where you decide to store your 'selfie-mask' folder.
- Add and delete image-files to your heart's content, but leave the folder structure (and the stretch.ps1 file) in place. The script requires that the 'uploads' and 'output' folders are located in the same folder as the script file.
-
- When the script is running it looks for your pre-cropped selfies in your 'uploads' folder. For each image it locates, it creates a stretched-cheek version of that selfie and deposits that new image in your 'output' folder.
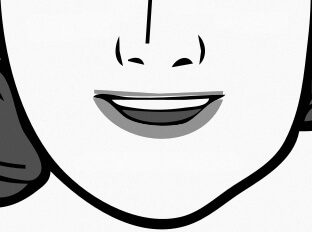
- For the best results, use only direct-on smiling selfies, cropped vertically from just under the eyes (the bridge of the nose). The image should also be cropped horizontally to get most of the cheeks… but not the ears. Here's an example of a properly-cropped selfie:
-
![Example showing the ideal crop for a selfie-mask]() The ideal crop for a selfie-mask
The ideal crop for a selfie-mask
- Test-out this script by using the sample-files that are located in your 'uploads' folder… good luck!
- You can download a compressed (zip) folder of our script and its corresponding files here: selfie-mask.zip.
- Note: * To get your Windows scripting security back to it's original "uber-secure" state, open PowerShell as Administrator and run the following command:
- Set-ExecutionPolicy Restricted